

A crisp exterior finish depends on what the trim keeps out as much as what it frames. Exterior window architrave installation takes more than a straight cut and a tidy edge: the surface, water management and careful alignment all affect the result.
If an opening or wall is uneven, small variations can show up as visible gaps or sloping lines. That’s why exterior work differs from fitting interior trim. Start with preparation and measurement, paying attention to the facade and the way each detail meets the window. The architrave should look balanced without obstructing drainage at vulnerable junctions.
This guide covers the installation sequence, from assessing the opening and preparing the surface to positioning, fixing and finishing the architrave. You’ll find practical checks for keeping profiles level and reveals consistent, along with guidance on why water management matters at each stage. For new builds and renovations, MasterLine Moulding coordinates design guidance, material supply and professional installation as one project, using laser-level assistance to support careful alignment and a cohesive exterior finish.
Key Takeaways
- Choose an architrave profile that defines the window opening and sits in proportion with the wider facade.
- Measure each side and use consistent reference lines to help keep the surround visually balanced.
- During exterior window architrave installation, dry-fit the pieces and check alignment before fixing them in place.
- Match the fixing method to the product and substrate instructions, and take care not to obstruct water-management details.
- For a new build, renovation or complex opening, coordinated design guidance, material supply and installation can help maintain a consistent result.
Exterior Window Architrave Installation: What the Work Involves
An exterior window architrave is trim fitted around the outside of a window opening. It frames the opening, defines its edges and helps the window sit naturally within the facade. Exterior window architrave installation is not simply an interior trim job moved outdoors. The architrave is exposed to the elements, so the mounting surface, the shape of the opening and the selected profile all influence the installation.
How exterior architraves relate to the window and facade
The architrave sits around the window opening. It doesn’t replace the window frame or change the window’s function; its role is architectural. A well-proportioned surround can give a plain facade a clearer focal point, while a more detailed profile can complement a traditional or French Provincial exterior. For a contemporary home, a simpler outline can create a quieter transition between the window and wall.
Consistent lines matter as much as the profile. The sides should appear balanced, and the top should relate neatly to the opening and surrounding wall. Architraves have long served decorative and practical roles in architecture; the overview of Architrave offers useful historical context. At a window, the architrave is one part of a larger arrangement. A sill forms the base beneath the opening, while facade bands and other mouldings contribute to the wider composition. Each element should read clearly without competing for attention.
What to assess before installation begins
Start with the actual opening, rather than assuming its edges are square or its surface perfectly flat. Inspect the wall on all sides, including existing finishes and the junctions where the trim will sit. Look for changes in surface level, loose or damaged areas, and anything that may obstruct the profile. These conditions affect the set-out and can mean the surface needs attention before fixing.
- Opening: Compare the visible edges and check how the window frame sits within the planned surround.
- Surface: Note uneven areas, changes in finish and the condition of the material the architrave will meet.
- Clearance: Identify nearby fittings, projecting details or other obstructions that could interrupt a clean line.
- Profile: Consider how the chosen depth and shape will sit against the wall and relate to the window and sill.
Exterior substrates vary, so the fixing approach should follow the selected product’s guidance and suit the surface on site. Because the junctions around a window are exposed, consider them as part of the facade’s overall water management, not just as decorative edges. A careful assessment sets realistic expectations: the opening, surrounding surface and profile determine what can be aligned neatly and how the work should proceed. This groundwork informs the measuring and set-out stage.
Prepare the Opening and Set Out Exterior Window Architraves
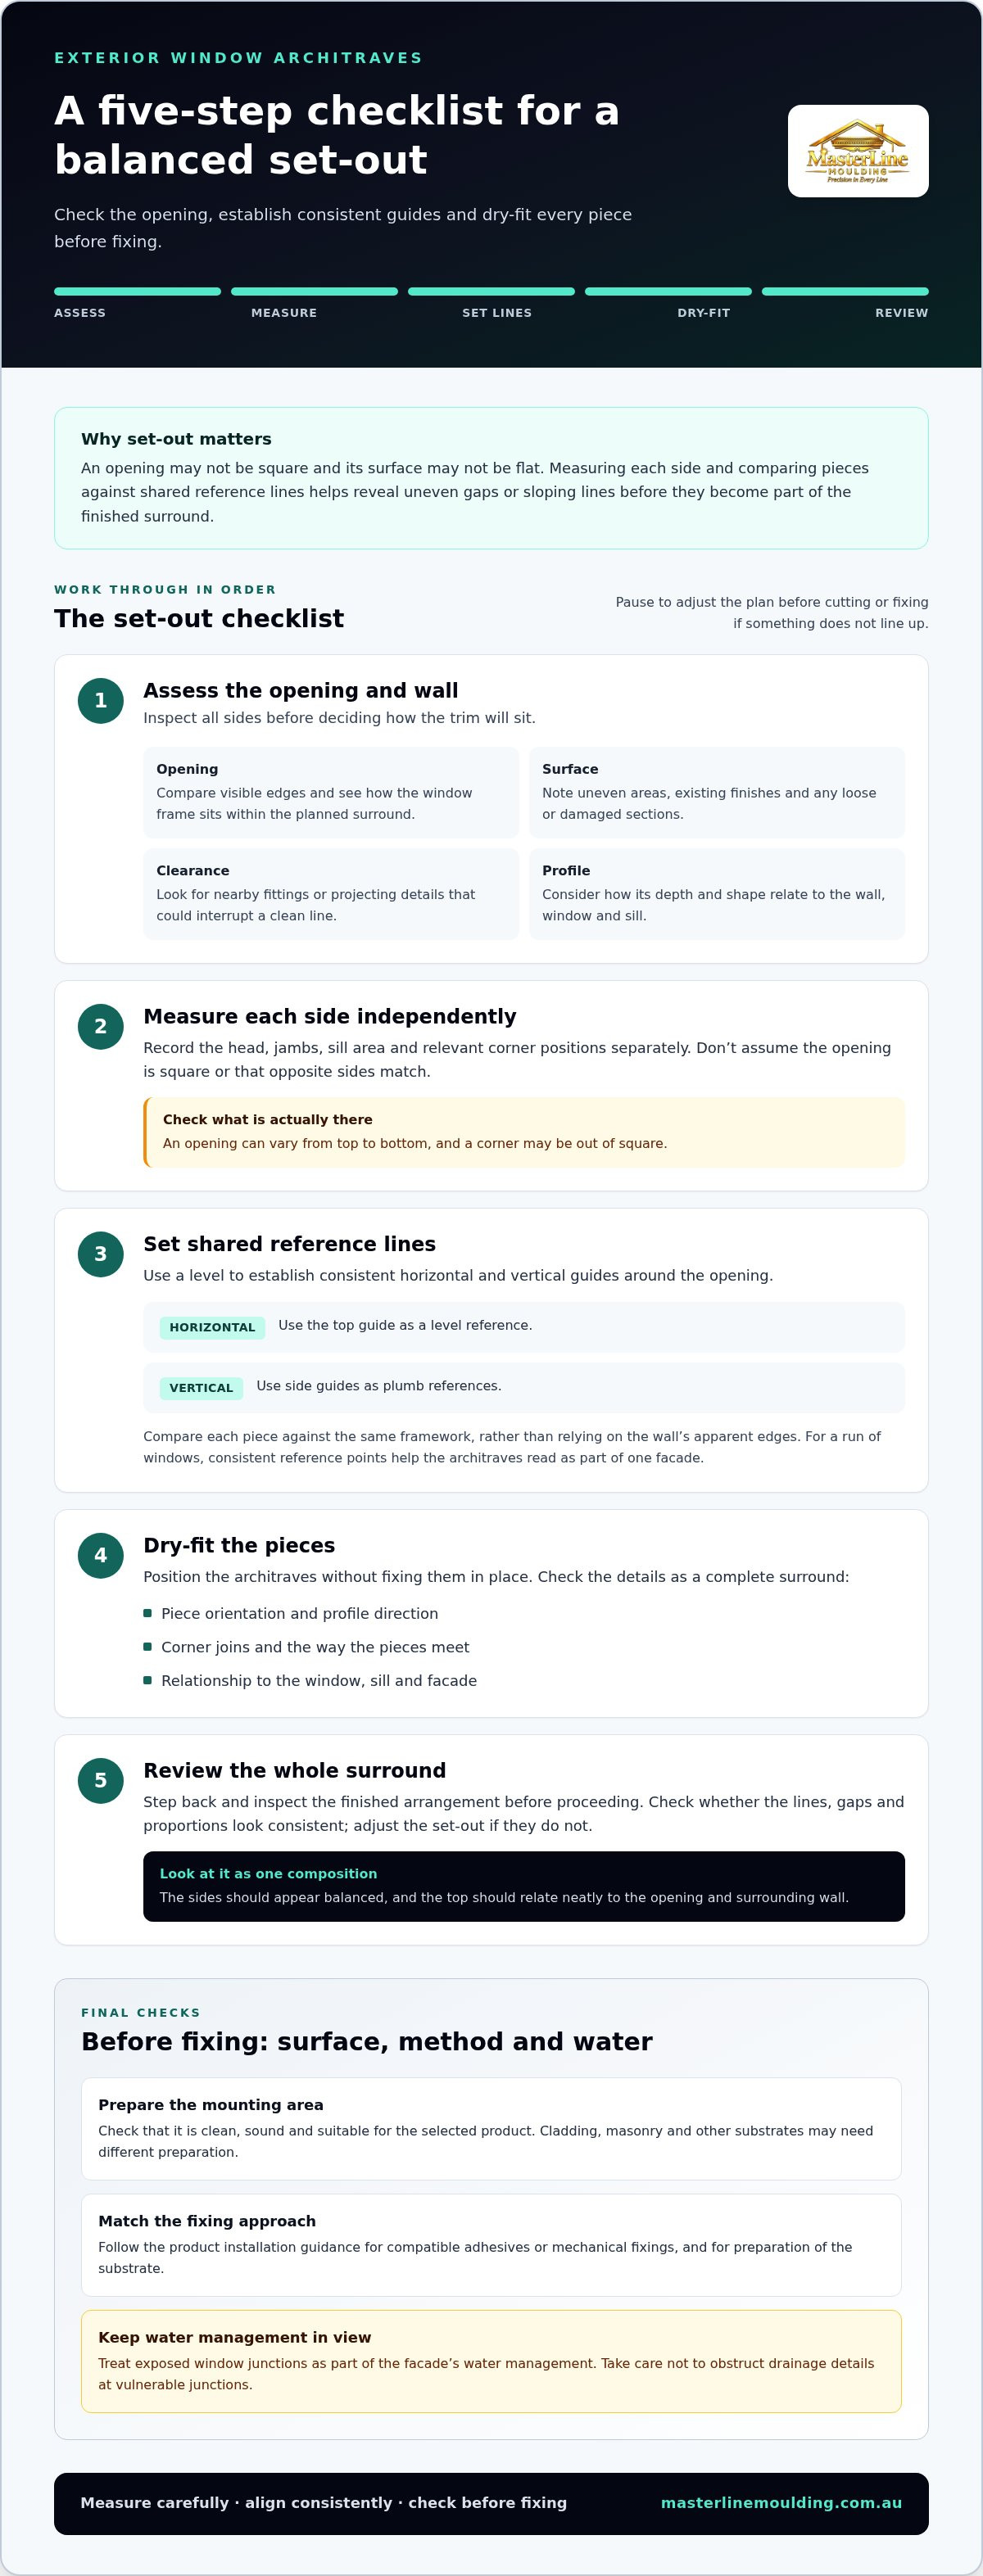
Good set-out turns an irregular opening into a considered installation plan. Before cutting or fixing any pieces, confirm the measurements, establish reference lines and check how the selected profile sits against the facade. This is particularly important across several sides of a window: small differences can make the whole surround look uneven, even when each piece appears straight on its own.
Use a practical sequence to keep decisions in order:
- Assess: Recheck the opening and mounting surface, noting uneven areas, existing finishes and obstructions.
- Measure: Record each side and relevant corner positions separately. Don’t assume the opening is square or opposite sides match.
- Set reference lines: Use a level to establish consistent horizontal and vertical guides. These provide a shared visual datum around the opening.
- Dry-fit: Position the pieces without fixing them. Check their orientation, corner joins and relationship to the window and facade.
- Review: Step back and inspect the complete surround. Adjust the set-out before proceeding if the lines, gaps or proportions look inconsistent.
Measure the opening and establish reference lines
Measure each side independently, including the available space at the head, jambs and sill. An opening can vary from top to bottom, or a corner may be out of square, so record what is actually there. A level helps establish straight lines around the opening. A dry-fit shows how the corners meet and whether the profile faces the intended way. Architraves can conceal junctions as well as shape an opening, as outlined in Architrave in modern construction.
Reference lines help separate alignment from assumptions about the wall. If the top guide is level and the side guides are plumb, compare each piece against the same framework. This makes differences easier to spot before they show in the finished surround. For a run of windows, consistent reference points between openings also help the architraves read as part of one facade, rather than as unrelated details.
Check the surface and plan the fit
Before fixing, check that the mounting area is clean, sound and suitable for the selected product. Cladding, masonry and other substrates can require different preparation and fixing approaches. Don’t treat a method that suits one surface as a universal solution. Follow the product installation guidance for compatible adhesives or mechanical fixings, as well as any preparation instructions.
During the dry-fit, compare the profile’s depth and edges with nearby facade details. Check that corners meet neatly and the surround doesn’t clash with a sill, cladding edge or other projection. If the surface varies, note where the fit needs attention and decide how to address it before committing to cuts or fixings. For exterior window architrave installation, measured set-out and product-specific preparation provide a clear basis for fitting. MasterLine Moulding coordinates profile guidance, material supply and installation; explore exterior architrave guidance when planning a cohesive facade.
Exterior Architrave Installation: Alignment, Fixing and Water Management
Once the opening has been set out, check the surround in position before fixing begins. This dry-fit is the final opportunity to compare the architrave with the reference lines, inspect the corner joins and see how the profile sits against the window and facade. A piece that looks straight on its own may still appear out of line beside the adjoining sections.
Fix the surround while keeping lines consistent
Work methodically around the opening, checking each section against the established guides as installation progresses. Look for even reveals between the architrave and window frame, consistent spacing at the edges and tidy joins where pieces meet. Recheck the whole surround as well as individual lengths; an adjustment at one point can affect the visual balance elsewhere.
The fixing order and method should follow the selected product’s instructions and suit the substrate. Depending on the system, that may involve compatible adhesive, mechanical fixings or a specified combination. There’s no universal fixing pattern or curing time for every product and surface. Follow the relevant guidance rather than adapting a method intended for a different material or installation.
- Before fixing: Confirm the dry-fit, profile orientation and corner alignment.
- During fixing: Keep checking the sections against their reference lines and maintain the intended reveals.
- As you progress: Follow the product and substrate requirements for the chosen fixing system.
These checks help preserve a clean, continuous outline. They also make it easier to catch movement or misalignment while adjustments are still practical, rather than after the full surround is in place.
Protect the window-to-facade junction
The architrave frames the opening, but it isn’t a substitute for correctly installed windows, flashing or other required junction details. Water management depends on the complete window-to-wall assembly. Water needs a suitable path away from vulnerable interfaces, and the trim must not obstruct details intended to manage drainage.
Sealants and flashing need to be compatible with the particular window, architrave, substrate and surrounding construction. Don’t assume that a bead of sealant resolves every junction, or that one detail suits all facades. Follow the product instructions and applicable project requirements for the assembly. Where flashing or drainage details are part of the window installation, fit the architrave with those details in mind.
Exterior window architrave installation calls for visual precision and practical care. A level surround gives the facade a composed finish; considered junctions help the decorative trim work alongside the building’s water-management details. Use the fixing method specified for the product, preserve intended drainage paths and review the finished lines from more than one angle.
Common Exterior Architrave Installation Problems and How to Avoid Them
Visible flaws around a window often begin before the architrave is fixed. A sloping line, a gap that changes width or a corner that won’t meet neatly can point to a measurement, set-out or surface issue. During exterior window architrave installation, pause to identify the cause before making a cosmetic adjustment. A quick patch may hide the symptom without correcting the fit or the window-to-facade junction.
Why gaps, uneven lines and untidy corners appear
An opening may not be square, and a wall may not be flat. If measurements assume otherwise, the pieces can follow different lines or leave uneven reveals. Inconsistent reference points and a rushed dry-fit can also shift the profile or expose mismatched corners. Recheck the opening and compare the pieces against the intended lines before fixing. Don’t force a trim piece to follow a surface if doing so distorts the surround.
- Sloping or uneven lines: Check the reference line and compare it with adjoining architrave sections. Confirm whether the opening or surrounding surface varies.
- Gaps that change in width: Revisit the measurements and dry-fit. Check that the profile sits as intended against the frame and facade.
- Untidy corner joins: Review the cut, orientation and meeting point of each piece before fixing. A corner that looks wrong in a dry-fit won’t improve once secured.
- Poor adhesion or unstable fixing: Reassess whether the surface is clean, sound and suitable for the selected system, then follow the product’s preparation and fixing guidance.
These checks can identify straightforward corrections, such as resetting a reference line or adjusting the fit before installation proceeds. If the substrate itself is uneven or unsuitable, reassess the installation approach rather than relying on a local trim adjustment.
When the installation detail needs a closer review
Some symptoms suggest more than a visual alignment issue. Movement after fixing, adhesive that fails to hold or moisture appearing at the window junction calls for a closer look at the complete assembly. The cause may relate to the substrate, fixing system, window installation, flashing or the way water is managed at the facade. The architrave alone can’t diagnose or correct every issue.
Don’t rely on trim to cover a poorly prepared surface, or on rushed sealant application to compensate for a junction detail. Sealants and flashing need to suit the particular products and assembly, and the architrave must not obstruct intended drainage paths. Avoid applying one repair method across different substrates or systems. First establish where the problem occurs and review the relevant installation guidance and project requirements.
If a window surround has persistent movement, failed adhesion or signs of moisture, have the installation detail assessed before making further changes. Arrange professional architrave installation with MasterLine Moulding, which coordinates design guidance, material supply and installation for new builds and renovations.
Plan Professional Exterior Window Architrave Installation
Professional installation can be a practical choice when a new build needs a consistent finish across several windows, or when a renovation involves uneven openings, existing finishes or complex facade details. The work is not simply fitting trim. Profile selection, material supply and on-site installation need to work together so the surround suits the building and can be set out carefully.
For exterior window architrave installation, MasterLine Moulding coordinates design guidance, material supply and installation within one project. This helps align profile decisions with the actual opening and wider facade before installation begins. It also gives the project a clear sequence, from choosing a suitable profile through to measuring and fitting it on site.
What coordinated design, supply and installation means
Profile choices affect more than appearance. Their scale and detail should relate to the window, the wall and the home’s architectural character. A surround for a contemporary exterior may call for a different expression from one suited to a French Provincial or traditional facade. MasterLine Moulding offers exterior styles suited to classic, traditional, French Provincial, contemporary and modern homes, with design guidance to help connect those preferences to the project.
Coordinating supply and installation brings the selected materials and fitting process into the same project plan. This matters for both new residential builds and renovations, where the opening, surface and surrounding finishes can differ. Laser-level-assisted installation helps check alignment as the architrave is fitted. It supports careful workmanship, while the result still depends on the opening, surface and installation details.
- For a new build: Plan the profile alongside the exterior design and window openings.
- For a renovation: Consider existing finishes and the condition and shape of each opening.
- For a complex surround: Include profile decisions and site conditions in the installation plan before work proceeds.
Discuss the project and its installation requirements
A useful project discussion starts with the basics: whether the work is for a new build or renovation, how many openings are involved and what the exterior style calls for. Details such as unusual opening shapes, existing trim or nearby facade features help define the scope. Photos or plans can also communicate the setting and the look you have in mind.
The project scope and quote are tailored to the work, including the selected profile and installation requirements. This gives the design, supply and fitting stages a shared point of reference, rather than treating each as a separate decision. For a considered exterior finish, discuss your project with MasterLine Moulding and outline the opening details and style you have in mind.
Shape a Considered Finish for Your Home
Start by deciding what you want the window surrounds to contribute to the facade. A restrained profile can keep the exterior clean and composed; a more decorative treatment can give the openings greater presence. Consider the home’s architectural style, existing details and the effect you want before choosing a direction.
For a new build or renovation, bringing those preferences into the project discussion helps turn a broad design idea into a practical plan. Share the opening details and exterior style you have in mind, then plan an approach suited to the work. With careful planning, exterior window architrave installation can add definition while sitting naturally within the overall design.
Discuss your exterior moulding project with MasterLine Moulding and take the next step towards a balanced, well-considered exterior.
Frequently Asked Questions
Can exterior window architraves be installed over existing trim?
Sometimes, but only if the existing trim is stable and the new profile can sit correctly without interfering with the window or facade details. Loose sections, layered build-up or a projecting edge may prevent a close, even fit. Assess the existing surround first. The selected architrave’s instructions should also specify whether it can be fitted over another material or needs to be fixed directly to the wall.
How do you measure an exterior window for architraves?
Measure each side of the opening separately, rather than relying on one overall width and height. Record the lengths and note corner conditions, uneven edges and how far the chosen profile will extend over the surrounding surface. For example, a window that narrows slightly towards the sill may need different measurements at the top and bottom. Allow for the profile’s corner joins according to its shape and installation instructions.
Does exterior window architrave installation need flashing?
Flashing may be required as part of the window-to-wall assembly, but an architrave itself doesn’t provide that function. The correct detail depends on the window, wall construction and surrounding materials. If flashing is part of the assembly, fit the trim without blocking its intended water path. For exterior window architrave installation, follow the window and architrave instructions and the project detailing, rather than relying on sealant or trim as a substitute.
Can exterior architraves be fitted to different wall surfaces?
Yes, exterior architraves can be fitted to different surfaces when the chosen product and fixing method suit the substrate. Masonry, cladding and other wall finishes can differ in texture, stability and preparation needs. A fixing suitable for one substrate may not be appropriate for another. Assess the surface and prepare it in line with the product guidance, including requirements for compatible adhesives or mechanical fixings.
What trade installs exterior window architraves?
A specialist in exterior moulding installation can coordinate the profile, materials and fitting details for the facade. MasterLine Moulding professionally installs exterior window architraves for new residential builds and renovations, with design guidance and material supply coordinated under one business. This is useful when the surround needs to complement other exterior mouldings or the opening has unusual dimensions that call for careful project planning.
Should exterior architraves be installed before or after the facade is finished?
The sequence depends on the facade system and how the window, wall finish and architrave junction are designed. Establish which layers or edges the trim must meet, and whether fitting it at a particular stage could cover a required junction detail. On a new build, coordinate architrave installation with the relevant facade work before setting the finish sequence. Follow product and project requirements.
How do you keep exterior window architraves straight and level?
Set clear alignment references before fixing, then compare each piece with those references as work progresses. A laser level can assist with consistent horizontal and vertical lines, while a straightedge can reveal changes in the wall behind the trim. Check the assembled surround from different viewpoints as well as close up. MasterLine Moulding uses laser-level-assisted installation to support careful alignment, alongside assessment of the site conditions.